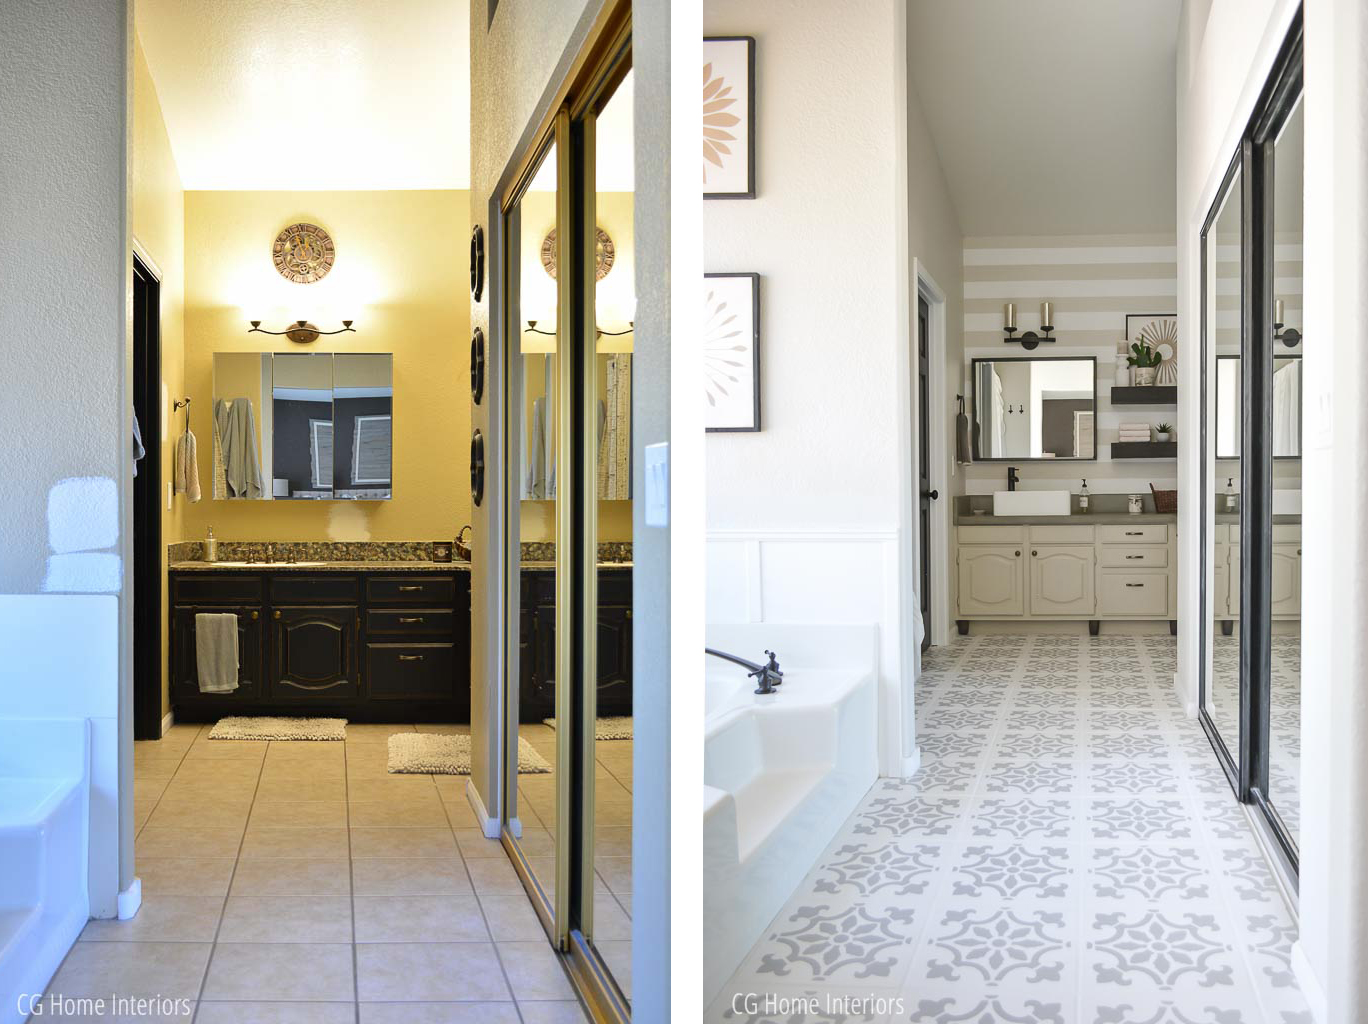
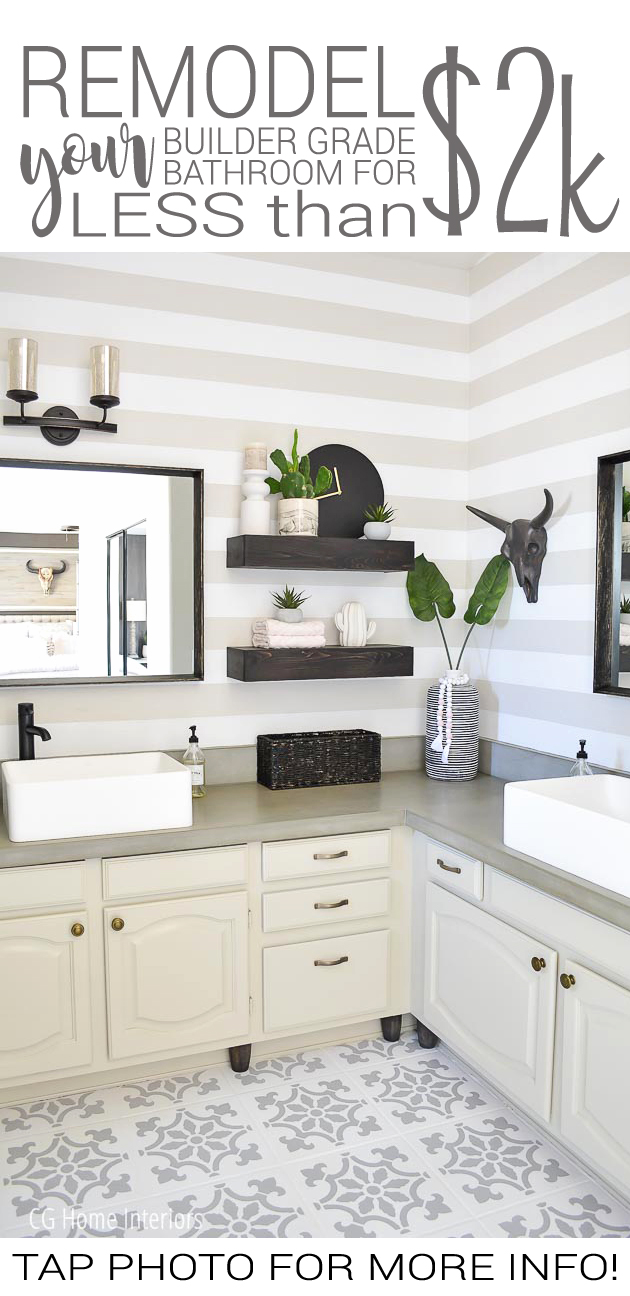
Patience is not my virtue and I can't stand living in disorganization and chaos, so I usually knock my larger DIY projects out in less than a week. Oh, but not this one. Not by a long shot! Upgrading my builder grade bathroom (and not even renovating it), took THREE long months. That's like the equivalent of dog years in my typical project completion time. LOL
{This post contains affiliate links at no additional cost to you and is also sponsored in part by Compound Concrete and Salted Words. All statements and opinions are 100% my own. I value my readers and will only stand behind products and company's I feel are worthy of your business.}
My problem with a project dragging on is that I start to lose sight of the actual impact I've made on the space. So thank goodness for before and after photos, because once I started looking through those it made me realize just how much the space changed, which made it all worth it. Part of the reason it drug out is because of my own indecisiveness. Toward the end when everything was coming together, something felt very "off" to me and I probably spent a good month trying to pinpoint it.
Last weekend I figured it out! It was the door casing I previously painted black. Lightening that up made all the difference. Thank the Lord, because I was about to paint the cabinets (again!) and really didn't want to add another layer of paint.

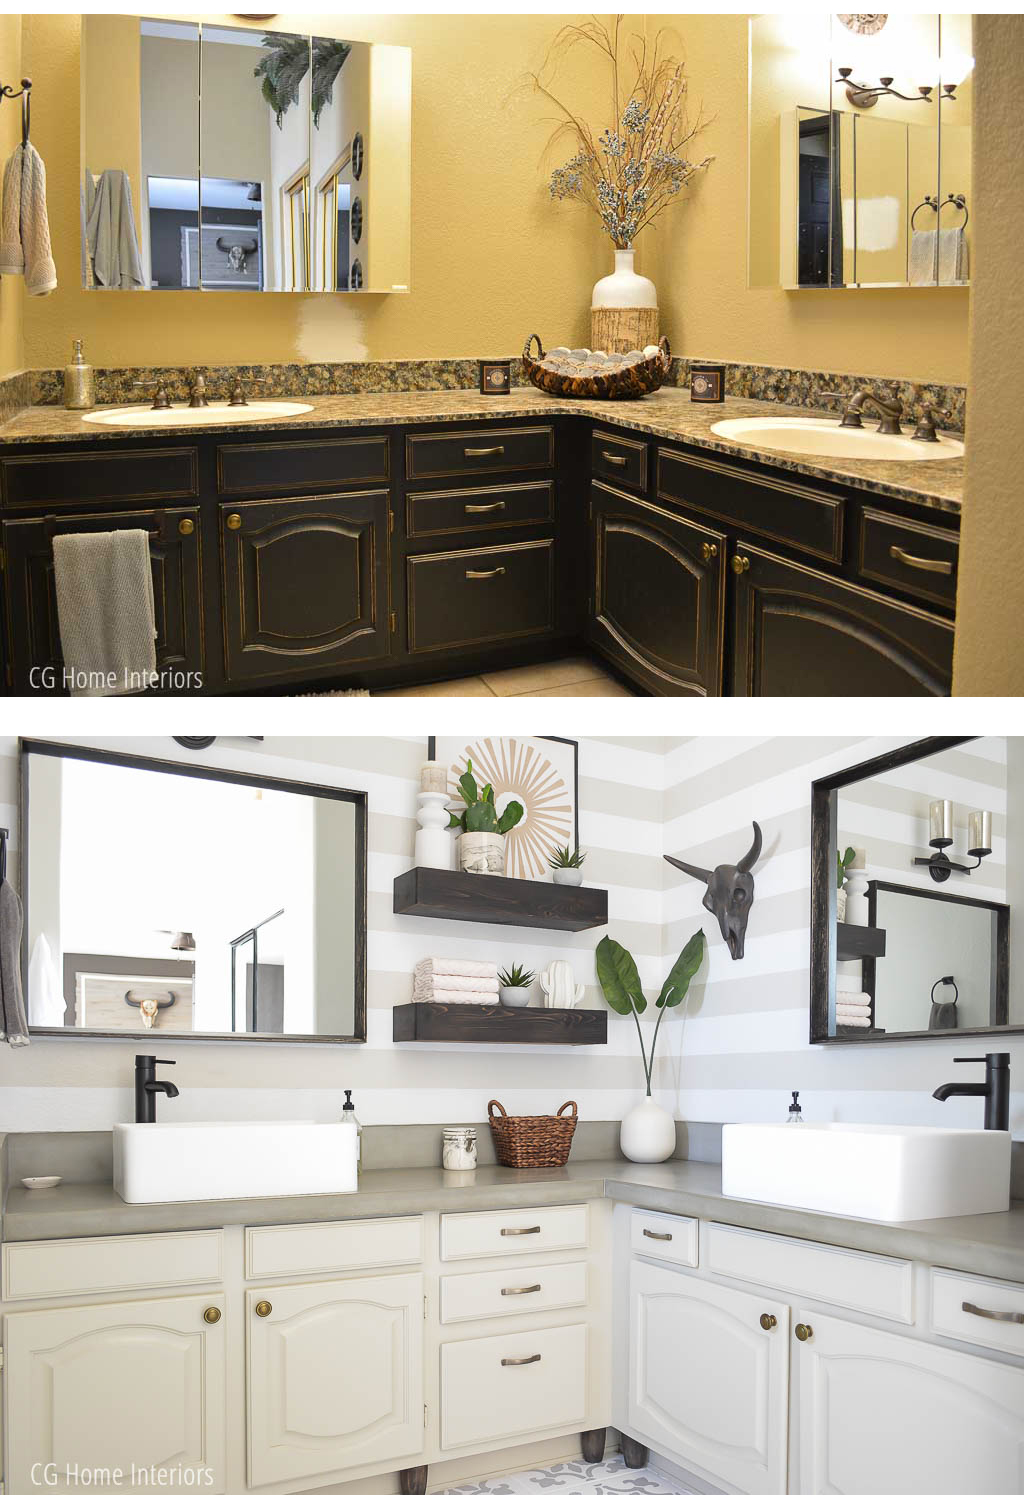
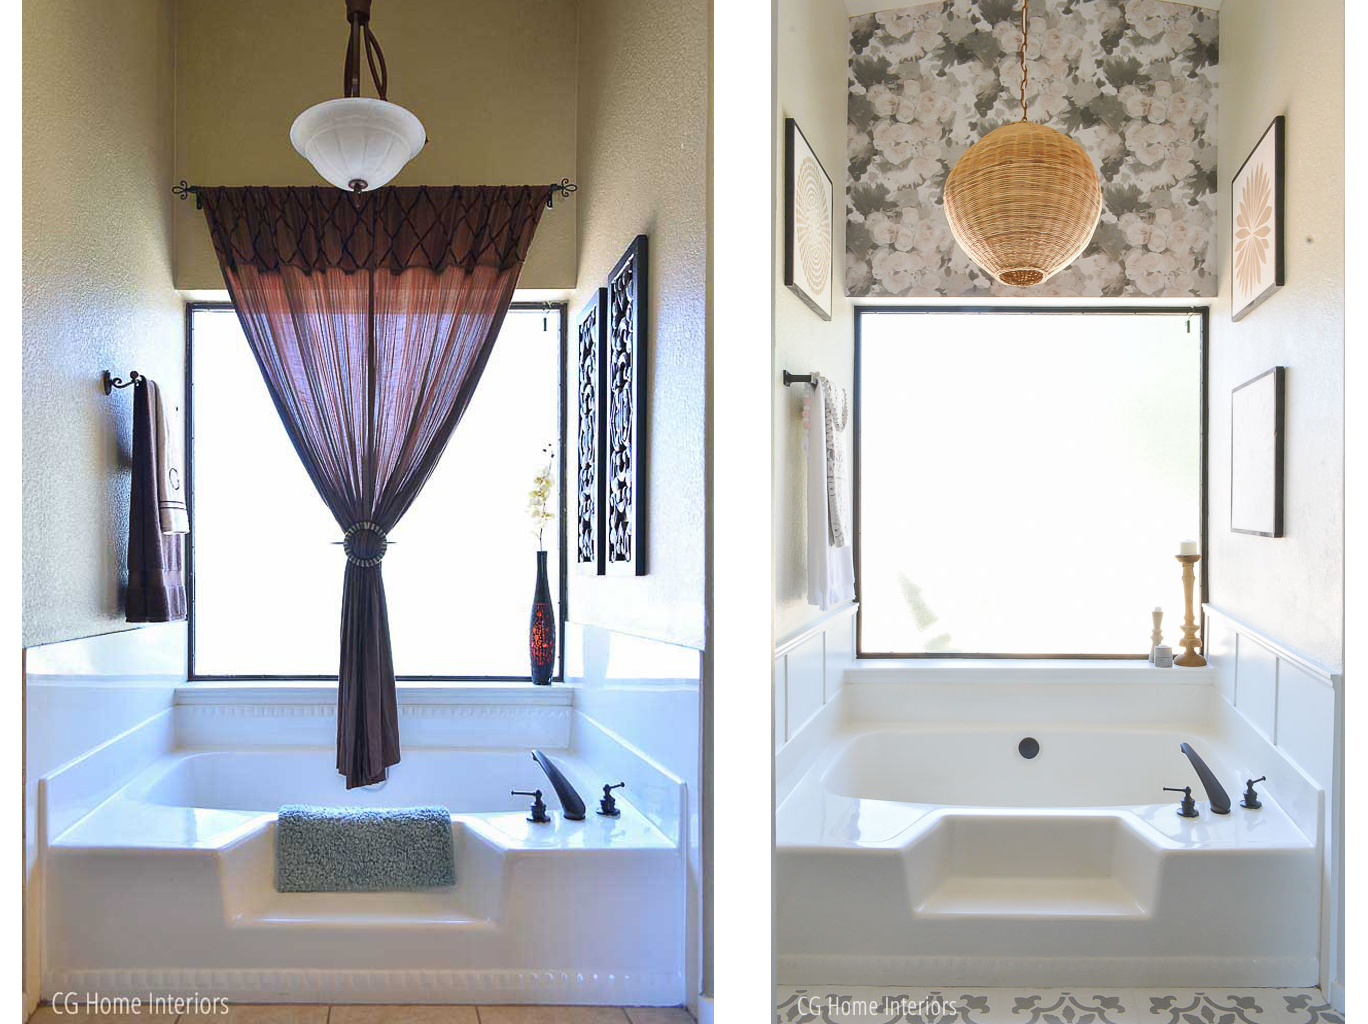
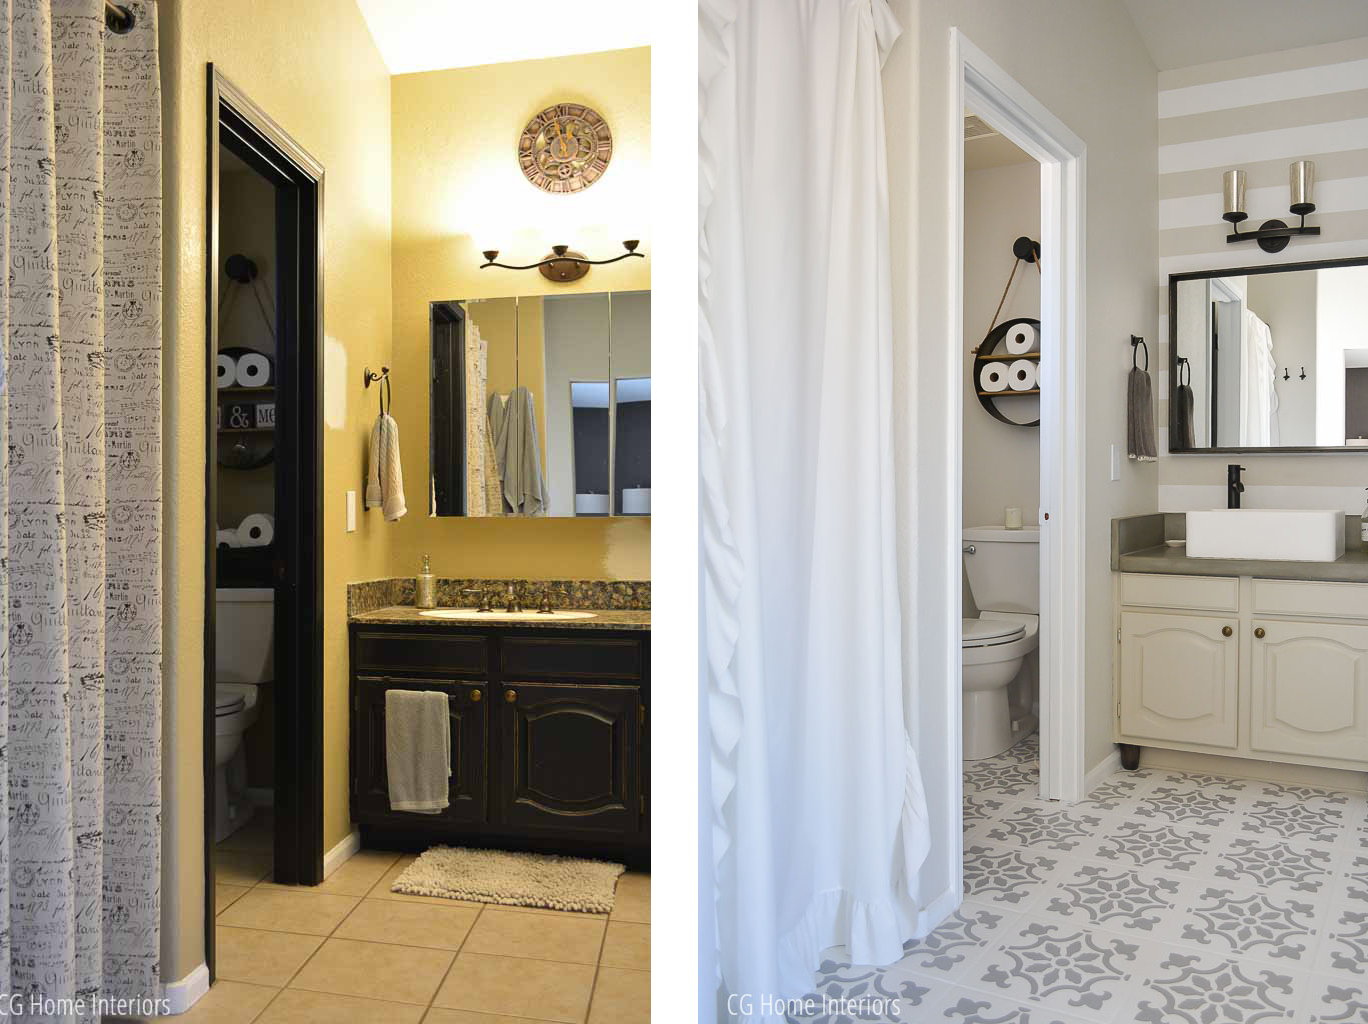
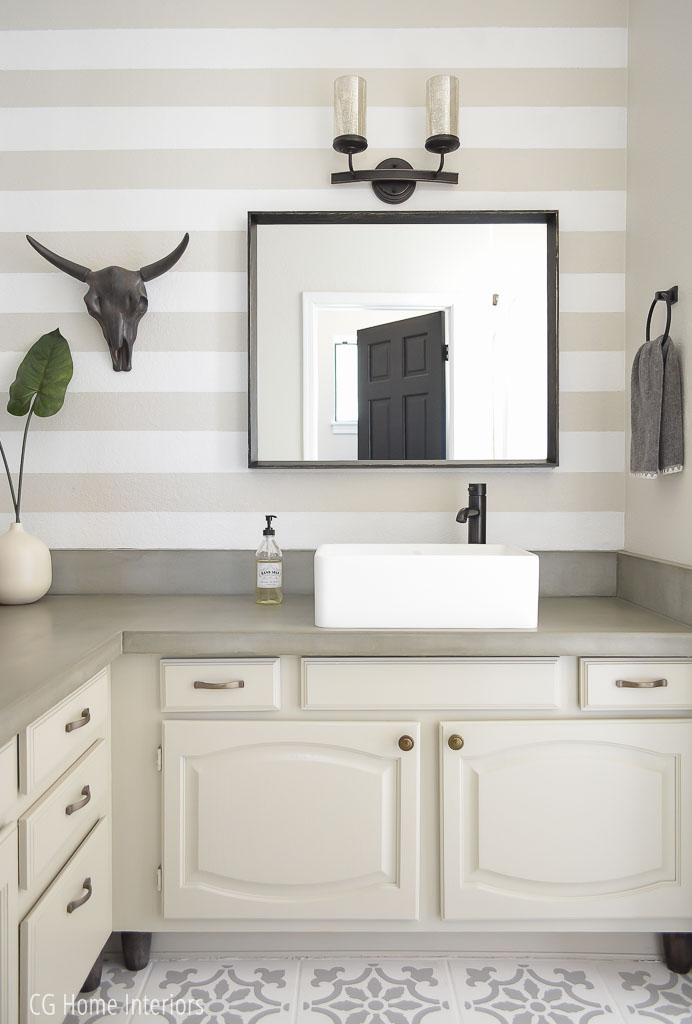
When we moved into this house my style was definitely more traditional with dark earthy tones. I didn't put a lot of effort into the master bathroom because the plan was to gut it down the road. The immediate changes were painting over the pinkish beige with a warmer beige, painting the oak cabinets black and using Giani granite counter top paint to get rid of the yellowing cultured marble on the vanity. This would hold me over for a while.
After two years of consistent projects around the house, the master bath renovation kept getting further and further down the list (and less in the budget) so I decided to do a complete overhaul in true Christina fashion - paint, paint, and more paint.
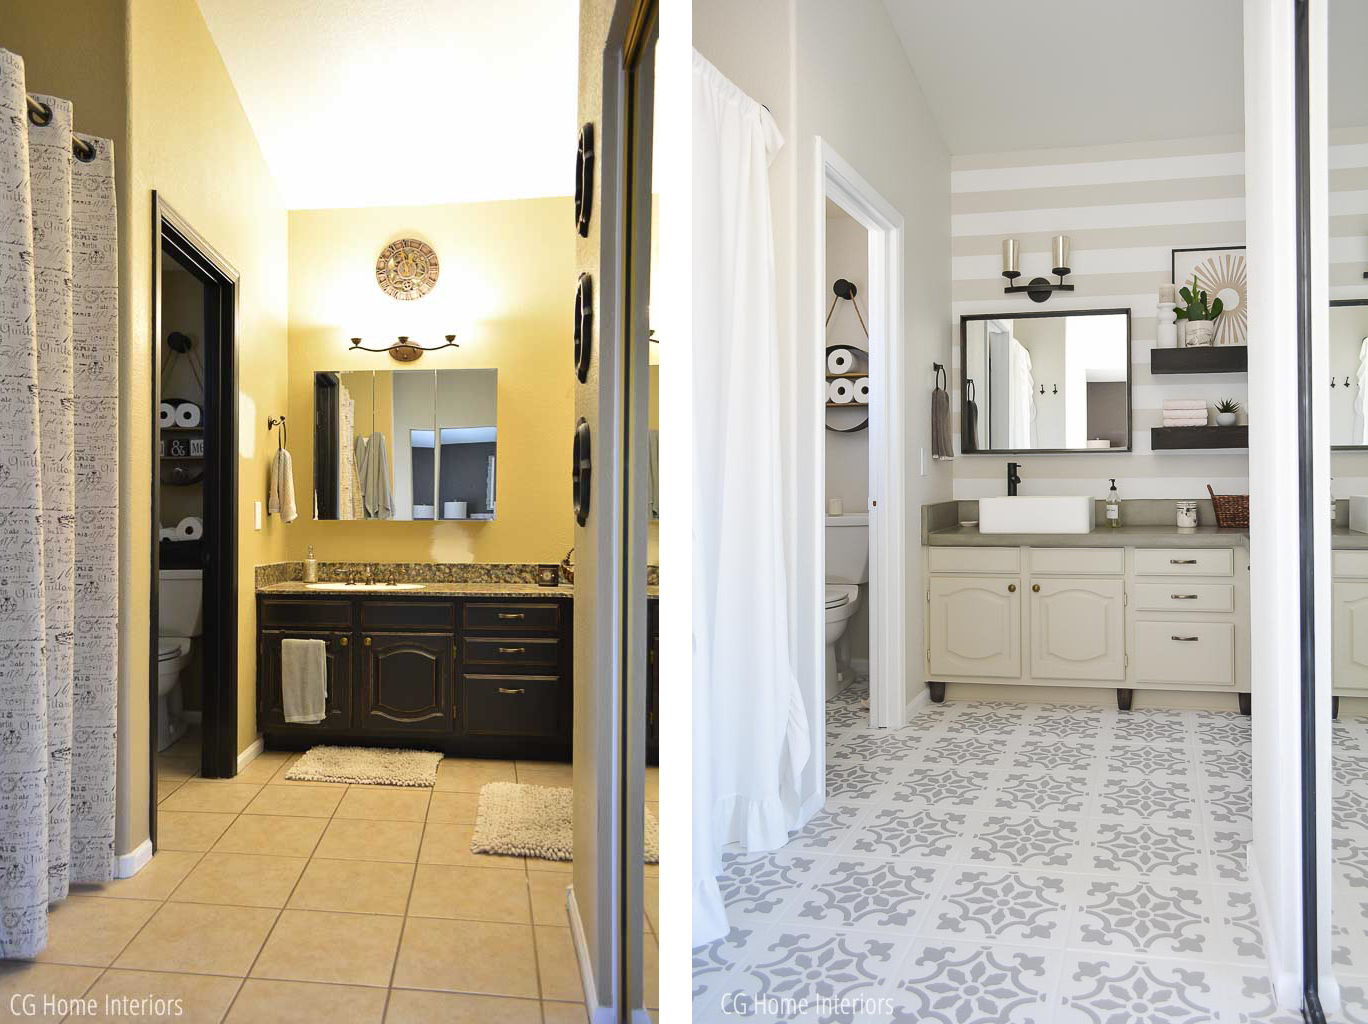
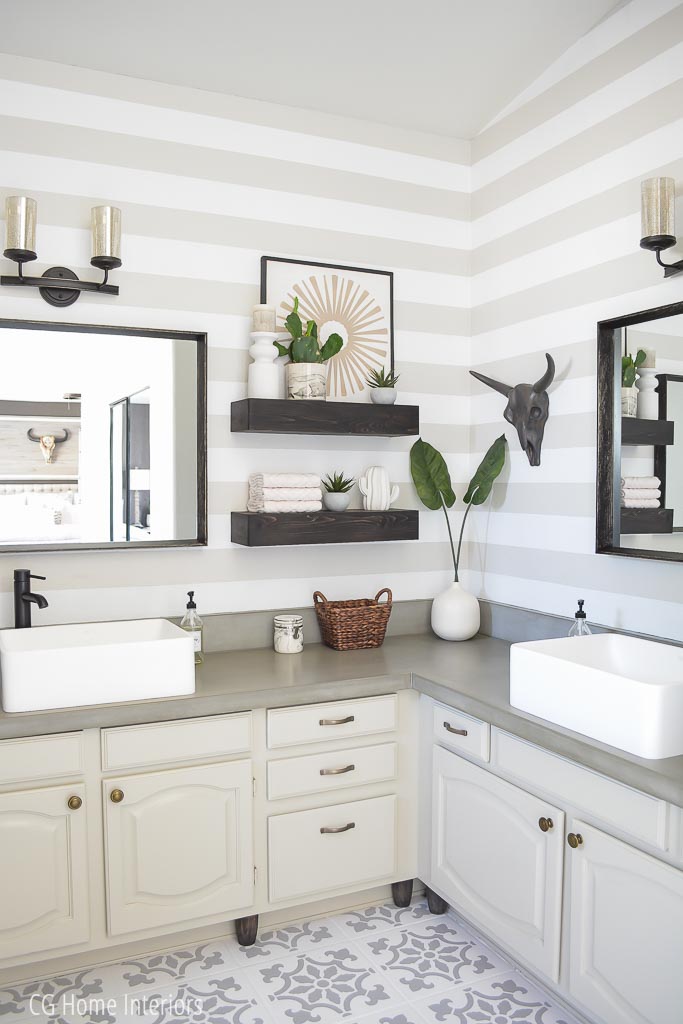
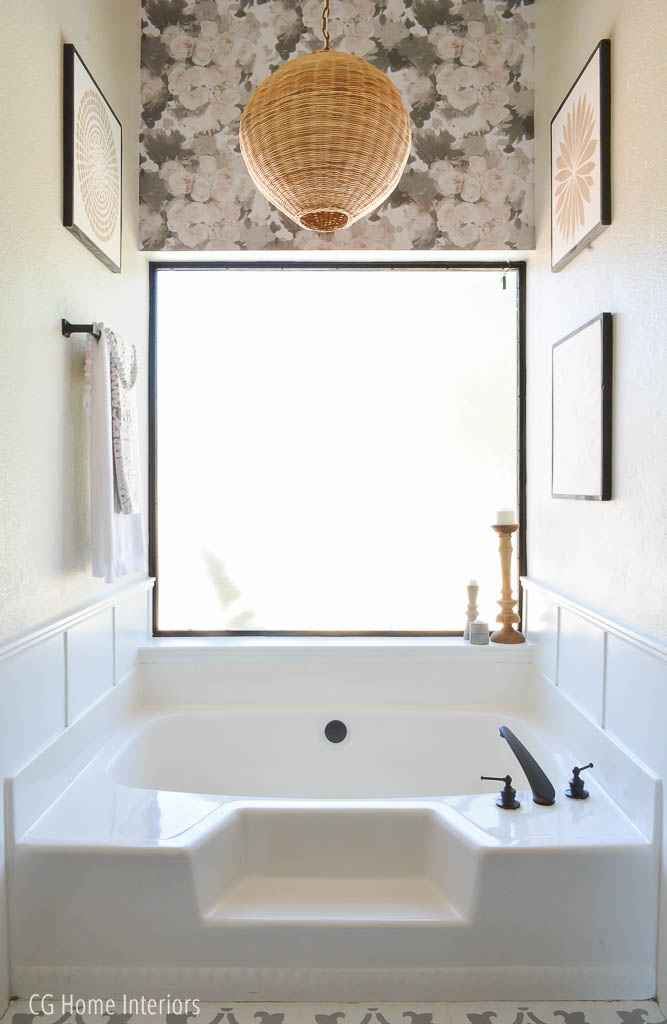
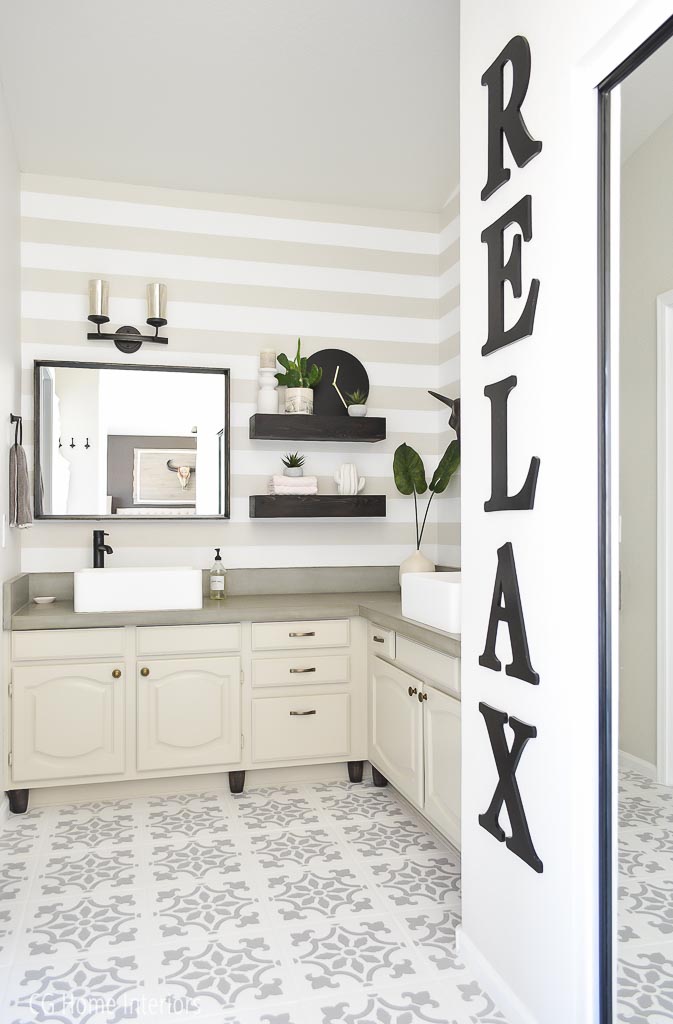
I painted the tile (tutorial to come), the walls, the closet frame, the cabinets and even dressed up the splashguard on the tub (click here for the complete tutorial on my builder grade tub update).
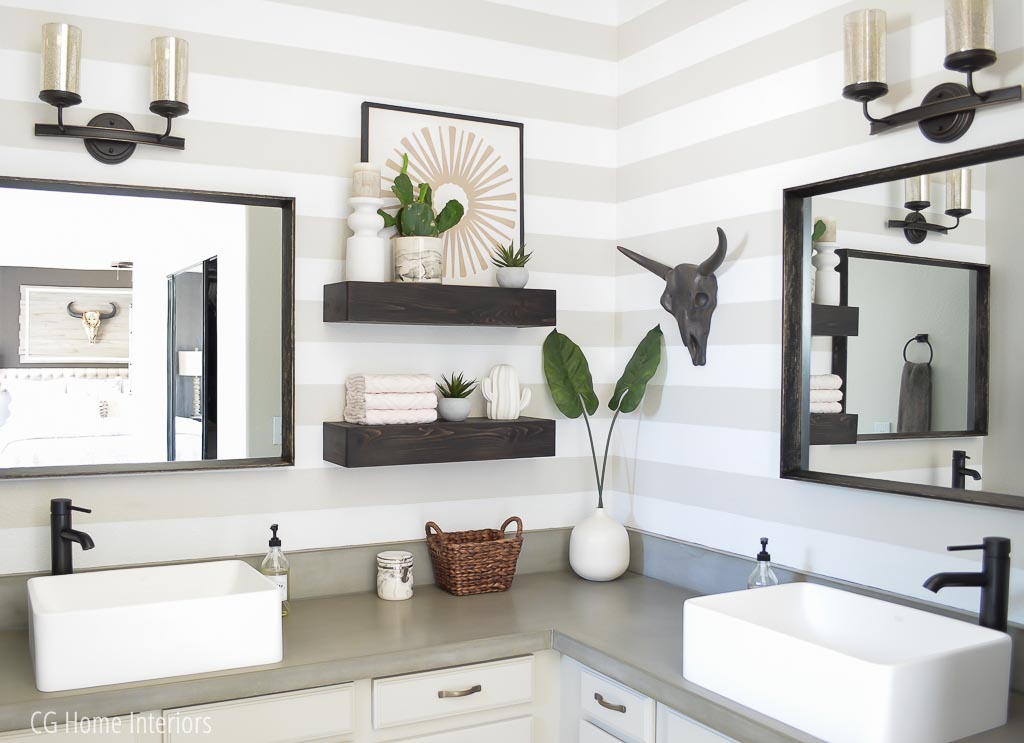
The biggest part of this project, and what completely pulled everything together, was the beautiful concrete countertops done by Compound Concrete. I cannot say enough about the owners, Daniel and Ashley. They are two of the sweetest people I've ever encountered who are so eager to build more than just a customer - they truly connect with their clients and make sure they are 100% satisfied. Daniel was very knowledgeable and even helped educate us when he came out to take measurements; talking through the process with us and discussing his recommendations on thickness of the countertops based on the sinks and faucets I chose.
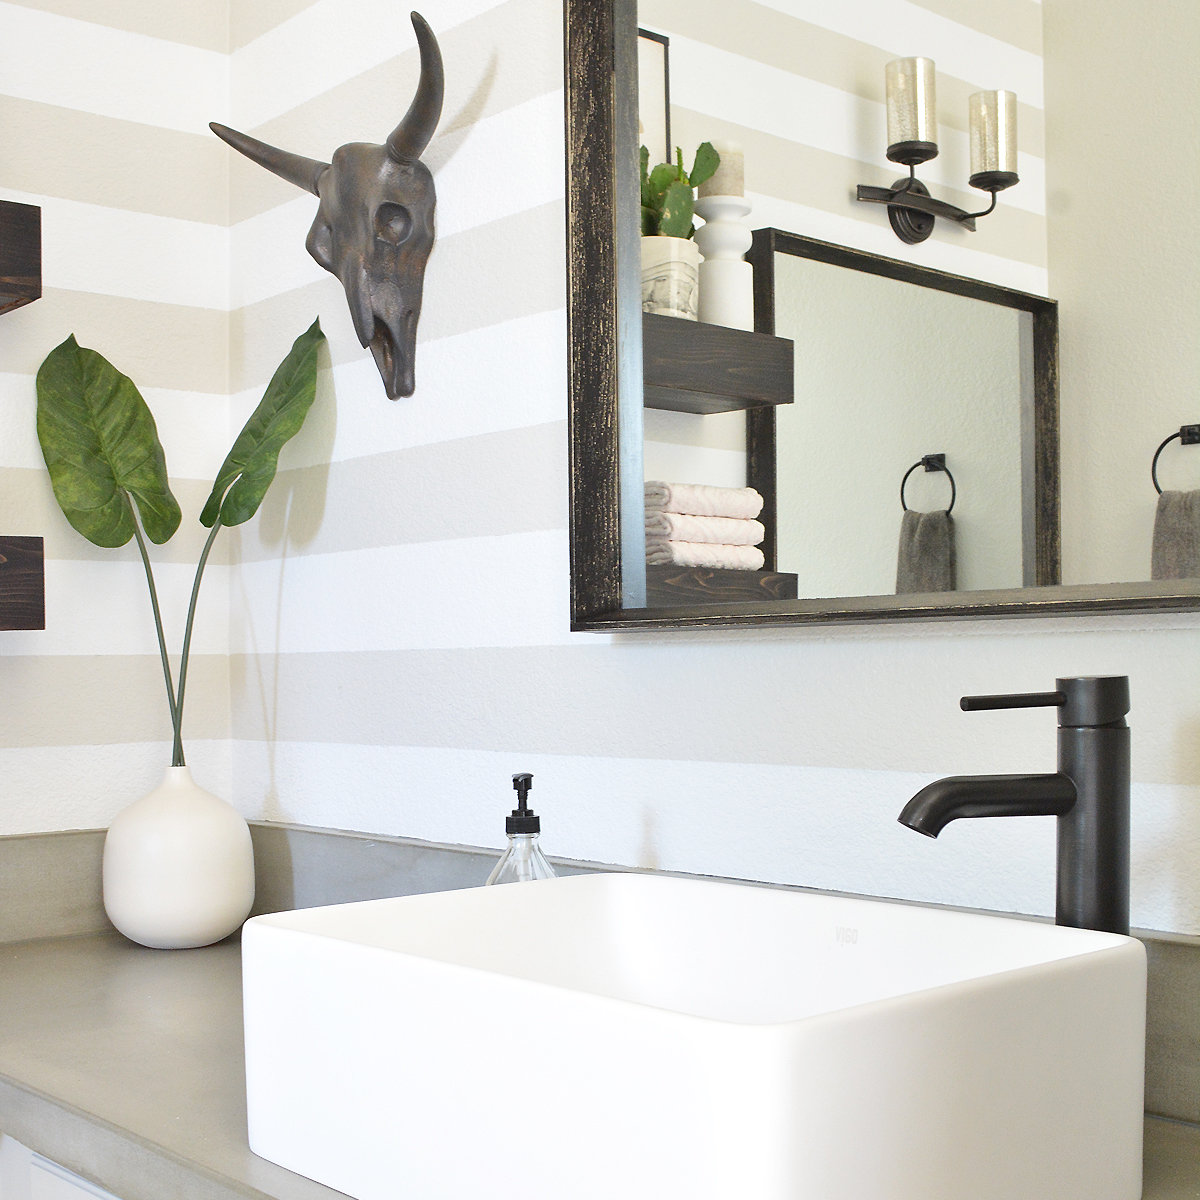
One thing was certain with this remodel from the beginning - I wanted vessel sinks. Our cabinets are short (and we are tall) so this was the perfect way to add some height for us without having to replace the cabinets. I really wanted to do two separate vanity dressers, but that would've required us to rip out the floor and blow our budget. We're saving all that fun stuff for the next house since this one is a stepping stone to our long term home.
My next big project will most likely be our second bathroom upstairs and there is no question I will be going with Compound Concrete to fabricate the countertop in there as well. I'm anxious to start that one because I want to go with more of a charcoal tint. The other thing that blew my mind is they can do WHITE concrete countertops. It's such a budget-friendly way to do new countertops and still have amazing durability like stone!
I could go on about that wonderful couple for days, but I'll just let you get to know them yourself on Instagram and Facebook and get back on track about the remodel...
One of the biggest challenges in the bathroom update was the vanity area. The sinks are placed so awkwardly and the light you see dead on when you walk in was completely off center from the sink and cabinets, so I moved the housing over a few inches to get it more centered. I've had Mr. CG teach me a lot, including some electrical, so I don't have to bother him every time I want to change out a light fixture. It just made sense to have him show me how to relocate it too.
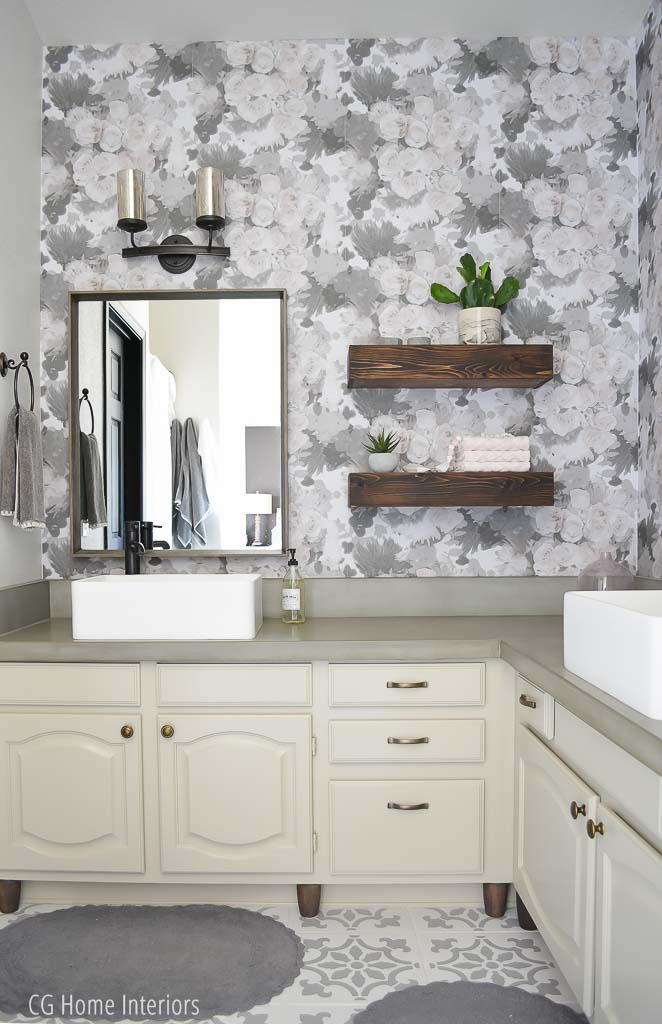
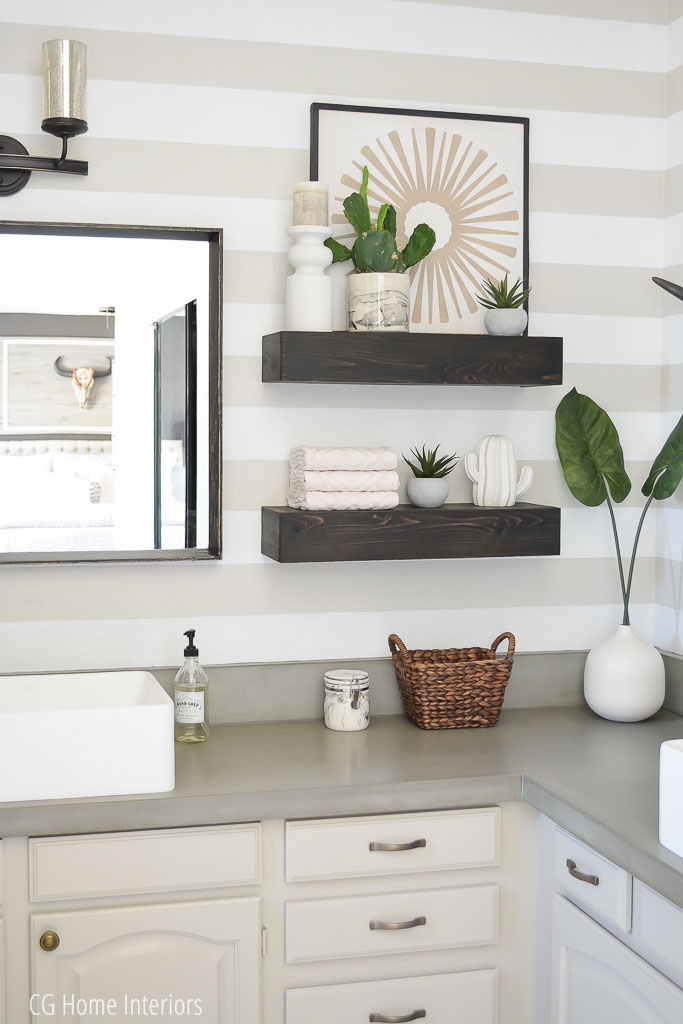
Next was figuring out what to do with the huge blank space to the right of that mirror, so I opted for floating shelves. I found this tutorial on Pinterest which ended up being a quick and easy project that made quite a statement in that space.
Even with the shelves, that wall needed a point of interest so I added this floral peel and stick wallpaper from Target. It worked splendidly in my bath nook, but it was just too much gray for me in the vanity area.
Down it came (which is super easy and why I love peel and stick wallpaper). I crave contrast and that paper made it too monochromatic for my preference - although it is a beautiful paper! Don't get me wrong, I love a beautifully done monochromatic room but the gray just looked drab. Like a cloudy day. I prefer mostly sunshine and an occasional cloudy day. :)
I thought about doing shiplap, but it seemed like so much more work at this point in the process. I also know how much I change things around here so the thought of all the damage it would do those walls that are already in a pretty poor state frightened me. I thought about several other options and everything seemed so permanent so I settled on stripes. I was worried because I didn't want it to look like a child's room or dated since stripes were a big thing in the early 2000s, but the truth is - stripes are timeless.
The other truth is, I believe there's always a way to put a modern spin on certain "dated" trends and I opted to go for a thinner stripe. If you're considering stripes, click here for a great tutorial on getting them perfect.
Also, USE FROG TAPE. I've seen it every time I go buy tape but I'm a total cheap-o and kept passing it up because of the price. I recently received a sample of it so I tried it on these stripes and I am forever sold on Frog Tape. No bleeding on textured walls!! I had to purchase another roll (and did it without hesitation) to finish my project.
I was nervous about the stripes but ended up really liking the point of interest it gave without being over-the-top. Once all that was figured out it was time for the fun part - decorating!
One of my favorite decor pieces is the set of 4 wooden prints from Salted Words. The quality and craftsmanship of their signs is excellent! I split up the set and put three of them in my bath nook while the other one is a beautiful focal point on my floating shelves.
If you're still reading then I think you're totally awesome and you should probably subscribe to my blog. :) Seriously though, I just had a subscribe tab added so you can click that on your screen to sign up and make sure you don't miss the latest and greatest DIY projects going on over here.
I've linked most of the products I used in my master bathroom remodel below. All you have to do is click the image to be taken directly to the product.
Don't forget to leave me a little love note below because I love hearing from my readers, and then pin your favorite photos above for future reference. OH, and don't forget to connect with me on Pinterest while you're over there!
XO,
Christina
P I N T H I S I M A G E :

Comments
Wow, it cam out beautiful!!!
Wow, it cam out beautiful!!! I love the new look and all the many changes you made. Great job Christina!!!
Thank you so much, Celeste!
Thank you so much, Celeste! You are awesome!
You did an amazing job, and
You did an amazing job, and were so right about the subtle stripes!!! Love it all!
Thank you, V! xoxo
Thank you, V! xoxo
I am in awe!! Going with your
I am in awe!! Going with your gut proved genius girl!! Love every detail!
Thank you SO MUCH, Martha!!
Thank you SO MUCH, Martha!! xo
You rocked this remodel!!! I
You rocked this remodel!!! I love the new look!
Thank you, Megan!! xoxo
Thank you, Megan!! xoxo
You amaze me girl. The
You amaze me girl. The stripes really pulled everything together and it looks so beautiful! I'm guessing we're gonna be seeing this gorgeous space in a magazine soon!!!!
Well now that would be fun,
Well now that would be fun, wouldn't it? ;) You amaze me right back. Thanks, girl!! xo
Looks awesome!! Those
Looks awesome!! Those countertops really fit into the under $2k budget??
Yes! Crazy, right?? $50/sq ft
Yes! Crazy, right?? $50/sq ft!
Love everything about this! I
Love everything about this! I'm going to push for concrete countertops in my master bathroom now!! Thanks for the inspiration!
You won't be disappointed!!
You won't be disappointed!!
Wow that view! Love the
Wow that view! Love the stripes! And that's great to know about white concrete.
I just saw a white one they
I just saw a white one they did recently and I LOVED it!
You did such a fabulous job!
You did such a fabulous job! It all looks amazing!
Thank you so much, Angie!! ❤️
Thank you so much, Angie!! ❤️❤️❤️
Being a successful hotelier,
Being a successful hotelier, I know how to keep upgrading the facilities, and bring changes as per the changing needs of time. Recently, I called up a team of plumbers to replace all showers for Southern Suburbs hotel, and modify the look of bathrooms by using unique ideas. It helped me to get appreciation from my regular customers.
That’s great!!
That’s great!!